Saturday, October 31, 2015

Shikoku 3-Day Itinerary: Day Three

Read Day 1 here - Uzu no michi, Mount Bizan
Read Day 2 here - Iya Valley, Oboke Gorge
Read Day 3 here - Kochi Castle, Ritsurin Garden

We got into Kochi (??) in the evening last night but the morning of day three, we noticed that the temperature was warmer than Tokushima which was not that far more north. We didn't have much time today as it would be a long journey back to our town so we did not get to explore Kochi as well as we would like.

Kochi Castle
We took the tram from Kochi Station to go to Kochi Castle (200 yen). The tram went to Harimaya Bridge, then we had to hop off and transfer to another tram which took us to Kochi Castle. The castle opened at 9am and we were there about 10 minutes before so it was quiet and relaxing. Entrance to the castle cost 420 yen and there were some displays inside. At the top of a few flights of stairs was a panoramic view of Kochi city. This is the fourth Japanese castle I have been to after the ones in Himeji, Nagoya and Matsuyama. Unfortunately I would have to rank Kochi Castle as number four.

Displays inside Kochi Castle
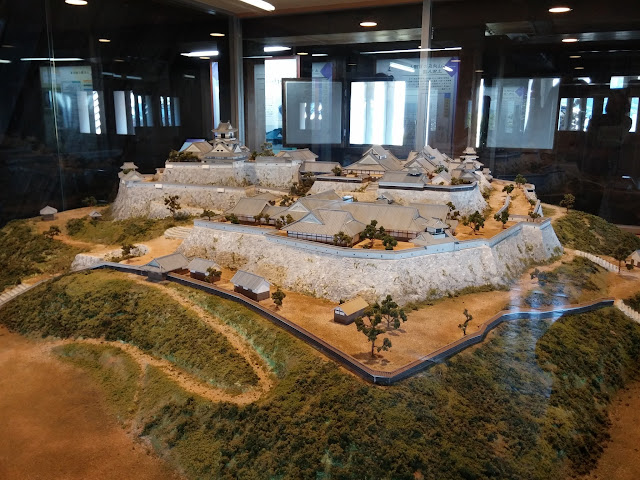
Model of Kochi Castle
Panoramic view from Kochi Castle
Instead of taking the tram back, we walked back under the arcades (covered shopping streets). We passed by Hirume Market (?????) which had an assortment of food goods. I found a kinken shop (??????) nearby which is a discount ticket shop and bought my train ticket from Kochi Station to Takamatsu Station (3050 yen).

Taking the 11:13am train to Takamatsu Station (??), we arrived at 1:32pm. We hopped onto another train (210 yen) that departed at 1:40pm for Ritsurinkoen kita-guchi Station (???????). This latter train only comes every half an hour. The ride to Ritsurin Koen/Garden was only 5 minutes and it was another few minutes walk to the north entrance of the garden. Entrance fee was 420 yen each.

Koi at Ritsurin Garden
Tranquility at Ritsurin Garden
Boat ride at Ritsurin Garden
The garden was beautifully trimmed and the abundance of koi fish in the water brought colour to the otherwise largely green garden. Sunlight filtered through the leaves and made the green glitter. I really experienced what the Japanese call komorebi (????) here. It's a great place to slow down your footsteps and collect your thoughts.

Walking back to Takamatsu Station took about 40 minutes and there was a long shopping arcade on the way. Again I bought my train ticket from Takamatsu Station to Okayama Station (??) at a discount shop and it cost 1320 yen. We took the 3:40pm train to Okayama Station and the journey was about an hour.

Okayama Castle
We took a tram from Okayama Station to Shiroshita stop (100 yen) which was only a few stops away. From Shiroshita, it was about a 10 minute walk to Okayama Castle. We saw it from the outside because it was closed by the time we were there.

That is the end of our Shikoku trip and we even managed to fit one sightseeing spot from Okayama in the end. From Okayama you can take the Shinkansen or train to wherever is next on your Japan journey.

Read Day 1 here - Uzu no michi, Mount Bizan
Read Day 2 here - Iya Valley, Oboke Gorge
Read Day 3 here - Kochi Castle, Ritsurin Garden

Shikoku 3-Day Itinerary: Day Two

Read Day 1 here - Uzu no michi, Mount Bizan
Read Day 2 here - Iya Valley, Oboke Gorge
Read Day 3 here - Kochi Castle, Ritsurin Garden

For day two of our trip, we headed to another part of Tokushima Prefecture (???).  Yesterday when we arrived at JR Tokushima Station, we went to the travel agency located there and asked about tours for Iya Valley and Oboke Gorge. She recommended the Bonnet Bus tour. I found the Bonnet Bus tour online prior to the trip but since it required telephone reservation and I didn't have enough Japanese to communicate, I didn't make the call. The travel agent called and made reservations for us and we paid her on the spot. It was 7500 yen for an almost 6 hour tour including lunch. 

Bonnet Bus
The All Shikoku Rail Pass can also be purchased there for 6300 yen for 2 days of unlimited JR rides in Shikoku. It even allows rides up to Okayama for when you leave Shikoku. 

JR Tokushima station
In the morning of day two, we took the 9am train from Tokushima Station to Awa-ikeda Station (????). We arrived at around 10:15am and waited until 10:40am for the tour to begin. There were about 20 people in the tour and half were foreign tourists while the other half were Japanese. The tour itself was mostly in Japanese but they gave us a poster in English at the beginning so at least we knew the names of the places we were going to. The language barrier wasn't a huge problem as long as you knew how to tell time in Japanese so you can understand when the guide wants you back on the bus.

The bus was a small and old vehicle but it zipped through the narrow, often single-lane, mountains roads. In mid-October, the weather forecast said low 20C in the afternoon but it was much colder in the mountains so dress warmly! 

Iya Valley
Peeing boy statue
A 40 minute drive took us to the first stop, which was the statue of a peeing boy overlooking Iya Valley (????). Some parts of the tour had English recordings playing over the loudspeaker to explain the sights. I didn't quite catch the story behind this statue but in any case, it was quite amusing to see the placement of this statue. The valley was very deep from our height up in the mountain and that itself was great.

Lunch
The next stop was already lunch. I was expecting a simple meal because it was included in the tour fee but it was actually a nice meal in a restaurant overlooking the valley. We were served soba noodles, a grilled fish, rice, miso soup and an assortment of other side dishes. I was very full at the end of the meal. 

Kazurabashi
After a short drive, we arrived at Kazurabashi (????). The bridge was 45 metres long over the Iya River. I have been to a few other suspension bridges before but this one was pretty special. It didn't sway especially dangerously but the floor boards were wide apart such that my small feet could easily slip through. As well, it looked like the bridge was only held up by vine and some pieces of wood (I sure hope there was more reinforcement underneath!) 

Walking on Kazurabashi
Vines that held up the bridge
The Heike Folk Museum was next and it was a traditional Japanese house with different old items inside from baskets to money. Then we went to a rest area in Oboke (???) and a monster greeted us as we alighted the bus. The rest area had a monster mansion and since it was the month of Halloween, they had staff in costume roaming the area and also costumes for kids to wear and take photos in. 

Monster!
The last stop of the tour was a boat cruise down Yoshino River in Oboke. This was the first time where I had to take off my shoes to ride a boat. The floor of the boat was matted and we took off our shoes at the bow before sitting down. The ride was leisurely and we rode in a calm part of the river where the guide pointed out at rocks that resembled animals on the way. He did so in Japanese and none of the rocks looked particularly like animals to me so I didn't know what animals they were supposed to represent.

Yoshino River
Boat ride
Observing interesting rocks
We were driven back to JR Awa-ikeda Station by 4pm. Overall I think this tour was pretty worthwhile because it would have been difficult navigating the large area via public bus. As well, all the places we went to, except for the rest area, required admission fee and the tour fee included all of those plus a good lunch.

We took the 4:30pm train from Awa-ikeda Station to Kochi Station (??). The ride was about 75 minutes and cost 2820 yen.

Read Day 1 here - Uzu no michi, Mount Bizan
Read Day 2 here - Iya Valley, Oboke Gorge
Read Day 3 here - Kochi Castle, Ritsurin Garden

Shikoku 3-Day Itinerary: Day One

Read Day 1 here - Uzu no michi, Mount Bizan
Read Day 2 here - Iya Valley, Oboke Gorge
Read Day 3 here - Kochi Castle, Ritsurin Garden

We were able to explore three prefectures in Shikoku (??) over three days. Shikoku is one of the four main islands of Japan. Departing from Sannomiya Station in Kobe, we took a bus to Naruto koenguchi (?????) where the whirlpools are. We took Shinki Bus which took 78 minutes and cost 2280 yen one way for advance purchase at the conbini.

Naruto Bridge
The bus dropped us off by 10:15am and a lady at the tourist booth told us that the next tidal change was at 11:30am. Since we had more than an hour to wait, we opted for the promotion which was 900 yen for entrance to the museum and Uzu no michi. The museum was small but informative about the whirlpools and famous bridges in Japan and around the world.

Interactive parts of the museum
Uzu no michi (???) was a walkway under the Naruto Bridge and had glass flooring so tourists can see the whirlpool in action below. I was mesmerized as the water swirled stronger and stronger as it approached 11:30am. The colour was a bright blue mixed with navy and pictures did not do it justice. I have heard that some people were disappointed by the Naruto Whirlpools but I think that it is just important to check the high and low tide times of each day to see them at their height of action.

Uzu no michi
Whirlpools forming under my feet
Uzu no michi
A short walk away from the bridge, down a flight of stairs behind the museum was the bus stop for heading to Tokushima (??). The ride took a little over an hour and cost 710 yen one way.

After dropping our things off at our hotel in Tokushima, we headed to Mount Bizan (??) with the intention of riding the ropeway up to see the sunset and night view (1200 yen round trip). However, there happened to be an anime festival that weekend and the queue for the ropeway was at least 1.5 hours long because there was an event on Mount Bizan.

On the hike up Mount Bizan
View of Tokushima City from Mount Bizan
Instead of waiting, we opted to hike up the mountain. It took about 45 minutes and most of the trail were rocks or tree roots. Only the beginning and end of the trail had proper stairs. I actually preferred the rocky trail because it was less tiring than stairs.

Sunset from Mount Bizan
The view at the top was great! We could see far out into the city and the sunset were gorgeous shades of crimson and orange descending behind the shadowy mountains. The queue going down the mountain was pretty long as well so we began our hike down before nightfall since it was not lit. We did not get to see the the night view but the beautiful sunset made up for it.

Read Day 1 here - Uzu no michi, Mount Bizan
Read Day 2 here - Iya Valley, Oboke Gorge
Read Day 3 here - Kochi Castle, Ritsurin Garden
Friday, October 30, 2015

Castle in the Sky and Kinosaki Onsen

Being a fan of Studio Ghibli, I have wanted to visit the Takeda Castle Ruins since I learned of it when I first came to Japan. It is said to be a Castle in the Sky like the Ghibli movie called Laputa and is also sometimes called the Machu Picchu of Japan. I have not yet been to Machu Picchu in Peru but the version in Japan is definitely much smaller in area and the hike is easier.

Lone bench at the Takeda Castle Ruins
After some research online, it was recommended that we go between sunrise to 8am. After 8am, the fog will have mostly dissipated and the castle among the clouds effect will be gone. On a Sunday morning, we set off at 5am and drove for about 1.5 hours to Asago (??). You can also take the train to JR Takeda Station (???). You can visit Asago's website here for more information on the castle's history and how to get there.

We followed the Google Maps route and it led us to a parking lot where traffic controllers told us that the lot was closed until 8am and directed us to another parking lot. At the next parking lot there was a sign with a map and we followed it to walk to the base of the mountain where Hyomaijinja is (????). We chose the sign that said 30-40 minute Mountain Trail (actually it had a typo and was spelled Mauntain Trail) that was visible on the left after you ascend the flight of stone stairs up to the shrine. If you do not want to hike, you can take a Zentan bus up for 500 yen. Check the schedule here.


The hike was steeper than I thought and although it was a cool morning, we were all sweating by the time we reached the top after many flights of stairs on the trail. Admission to the castle ruins cost 500 yen. We reached the top around 7:30am and the view was definitely worth the steep hike. The dense fog hung over the castle ruins allowing parts of the lush green rice fields at the bottom to peep through. 7:30am in the morning may seem early but if you were going to make your way out there, you should try your best to come before the fog goes away.


The castle in the sky photos used to promote the Takeda Castle Ruins were probably taken from a helicopter or on a mountain on the opposite side because this trail leads you to the castle ruins itself so you cannot see it in its entirety enveloped by clouds. However, it was still very pretty and serene. Despite the word "ruins" in the name, the place was tidy and well kept with rope to prevent tourists from stepping out of bounds into dangerous zones. There were no visible remnants of the castle left except some stone bases. The hike down the mountain was much, much easier and quite enjoyable.

Kinosaki Onsen area
After a day of early morning hiking, we drove for another hour to Kinosaki Onsen (????), a quaint onsen town with seven different onsens. Honestly, we chose one at random and tried out Ichino-yu (600 yen per person). The water was very hot and there was a semi-outdoor section which was less hot.

Crab Soba
We found lunch at a restaurant by the river and I tried some crab soba because crab is supposedly famous in this part of Hyogo Prefecture. In all, it was a productive day with a good balance of exercising and relaxing.

Thursday, October 29, 2015

Otsu, Uji, Osaka: 1-Day Itinerary

I wanted to make the most of my Seishun 18 pass (??18???) and I was able to pack three prefectures and three cities into one day. Of course this only allowed me to see one or two sights in each city but I didn't mind because I had specific targets for each anyways.

Lake Biwa seen from Otsu, Shiga
Starting from Himeji (??) I took the JR Rapid Service to Otsu (??) which took 100 minutes because I could not ride the Shinkansen with the Seishun 18 pass. Otsu is the capital of Shiga Prefecture (???) and is one of the cities that you can see Lake Biwa (???), the largest freshwater lake in Japan.

From the JR Otsu Station, I took a city bus (200 yen) to Otsu Port to see Lake Biwa. The weather was gorgeous, albeit a bit hot and the gentle breeze made it a pleasant visit. You can rent bikes and ride along the water in the park next to the port. I ate lunch here overlooking the lake and went back to the JR station for the next destination.

Tourist street in Uji
Matcha drink in Uji
The train ride to Uji (??) in Kyoto Prefecture (???) was between 30 to 40 minutes and required one transfer in Kyoto city. From JR Uji Station, there were clear signs and photocopies of instructions for tourists to get the directions to Byodo-In Temple (???). The Byodo-In Temple has a home on one side of the 10 yen coin. The walk to the temple was about 15 minutes and on the way you pass through a souvenir street selling matcha products in every shop since that is what Uji is famous for. The admission to Byodo-In Temple cost 600 yen.

Byodo-in Temple
Comparing the temple on the back of the 10 yen
Inside is the Phoenix Hall
There were a decent number of people inside when I was there in the late afternoon but incomparable to the crowdedness of Kinkakuji (???) in Kyoto. Therefore it was more pleasant to just stand and observe the temple while comparing it to the 10 yen coin in my hand. There were some women in yukata taking photos with their friends which matched the environment very well.

Famous matcha store
After having some matcha dessert at a nearby store, I hopped on the next train to the last city and the last prefecture of the day: Osaka (??) in Osaka Prefecture. The train ride was between 50-60 minutes and required a transfer in Kyoto again.

Shinsaibashi area
Dotonbori
In Osaka, I met my friend at Shinsaibashi (???) to look around the shops and ate some takoyaki around Dotonbori (???). Osaka was very crowded and lively on this Saturday evening. We had a tabehoudai (????) dinner which means all-you-can-eat but the one we went to wasn't that great so I won't mention it.

All in all, my trip covered a decent area and I was able to go about leisurely. If I had more time, I would probably eat more matcha goodies in Uji!

Osaka

Friday, October 23, 2015

Apple Watch has finally arrived at Power Mac Center


Apple Special Event last September made another milestone as it introduced to the world the all new series Apple Watches. The unveiling of Apple Watch made so much noise that ever since the day of event, people can't get enough to have it on their hands and experience it. Which includes us, Filipinos.

But after a month of anticipation, finally, I can now say that the long wait is over as Power Mac Center launches Apple Watch in the Philippines. Power Mac Center has become a reliable retail  shop and service provider of Apple products to the Filipino consumer. That's why it is no surprise why Apple appoints them to have the first launch of the Apple Watch here in the country. The big reveal happened yesterday (October 23) at Power Mac Center's flagship store in Greenbelt 3.

Look at those people whose waited this long for the Apple Watch
Apple Watches' straps are interchangeable
The Apple Watch collection comes in three models: the aluminum Apple Watch Sport, the stainless steel Apple Watch, and the solid gold Apple Watch Edition. All (3) three Apple Watches are available in 2 sizes, the 38-mm and 42-mm. Apple Watch may now avail at Power Mac Center Greenbelt 3 and Trinoma with prices starting at 19,990 PhP for the Apple Watch Sport; stainless steel Apple Watch at 30,990 PhP; and Apple Watch Edition at 560,000 PhP

Note: Apple Watch Edition, crafted from custom rose or yellow 18-karat gold alloys, is available exclusively at Power Mac Center Greenbelt 3. Those who want to try it on may arrange an appointment and be assisted by Apple Watch Experts deployed in-store.

Visit Greenbelt 3 to see the Apple Watch display
I was one of the lucky people who got to see and experience Apple Watch as it launches here in the Philippines. Together with other bloggers and writers, we got a special demo from Power Mac Center on Apple Watch.

Aside from this watch can enable the users to view key notifications like call, text and email alerts, Apple Watch supports most iOS apps. It is particularly proud of its integrated health and fitness apps. Apple believes that fitness isn't just limited to sports or hitting the gym. Apple Watch tracks every physical activity and encourages further movement. It ultimately helps set and keep track of fitness goal.

The unboxing of Apple Watch Sport
Everybody is excited to have that shot with the Apple Watch Sport
Pairing the Apple Watch on Iphone 6
The impromptu Apple Watch model that day
Just as what Assistant Brand Manager of Apple for Power Mac Center -- Ivan Ambrosio said, "Apple Watch is a reimagining of the watch as we know it. It's a unique timepiece with innovative features perfect for any Filipino lifestyle - be it for fitness enthusiasts, working professionals, even fashion-savvy ones"

Even the Sport edition Apple Watch looks sleek and stylish
So what are you guys waiting for? Visit Power Mac Center Greenbelt 3 or Trinoma to see it yourself as well! For more information, go to http://www.powermaccenter.com or follow them at:

Facebook: www.facebook.com/powermaccenter
Twitter: www.twitter.com/powermaccenter
Instagram: www.instagram.com/powermaccenter

Thank you for having us!